Video Basics (Part 3): Compression
Now that we’ve covered the way your camera sensor and the processor reduces files' size without a noticeable compromise in image quality (IQ) we need to look at the tool the camera uses to perform this compression: codecs. Video Basics is a four part series with SUNSTUDIOS Retail Manager, Neale Head.
PART ONE: FRAME RATES & RESOLUTION | PART TWO: COLOUR DEPTH & SUB SAMPLING | PART FOUR: COLOR SPACE, LOG & LUTS
Wrapping about codecs
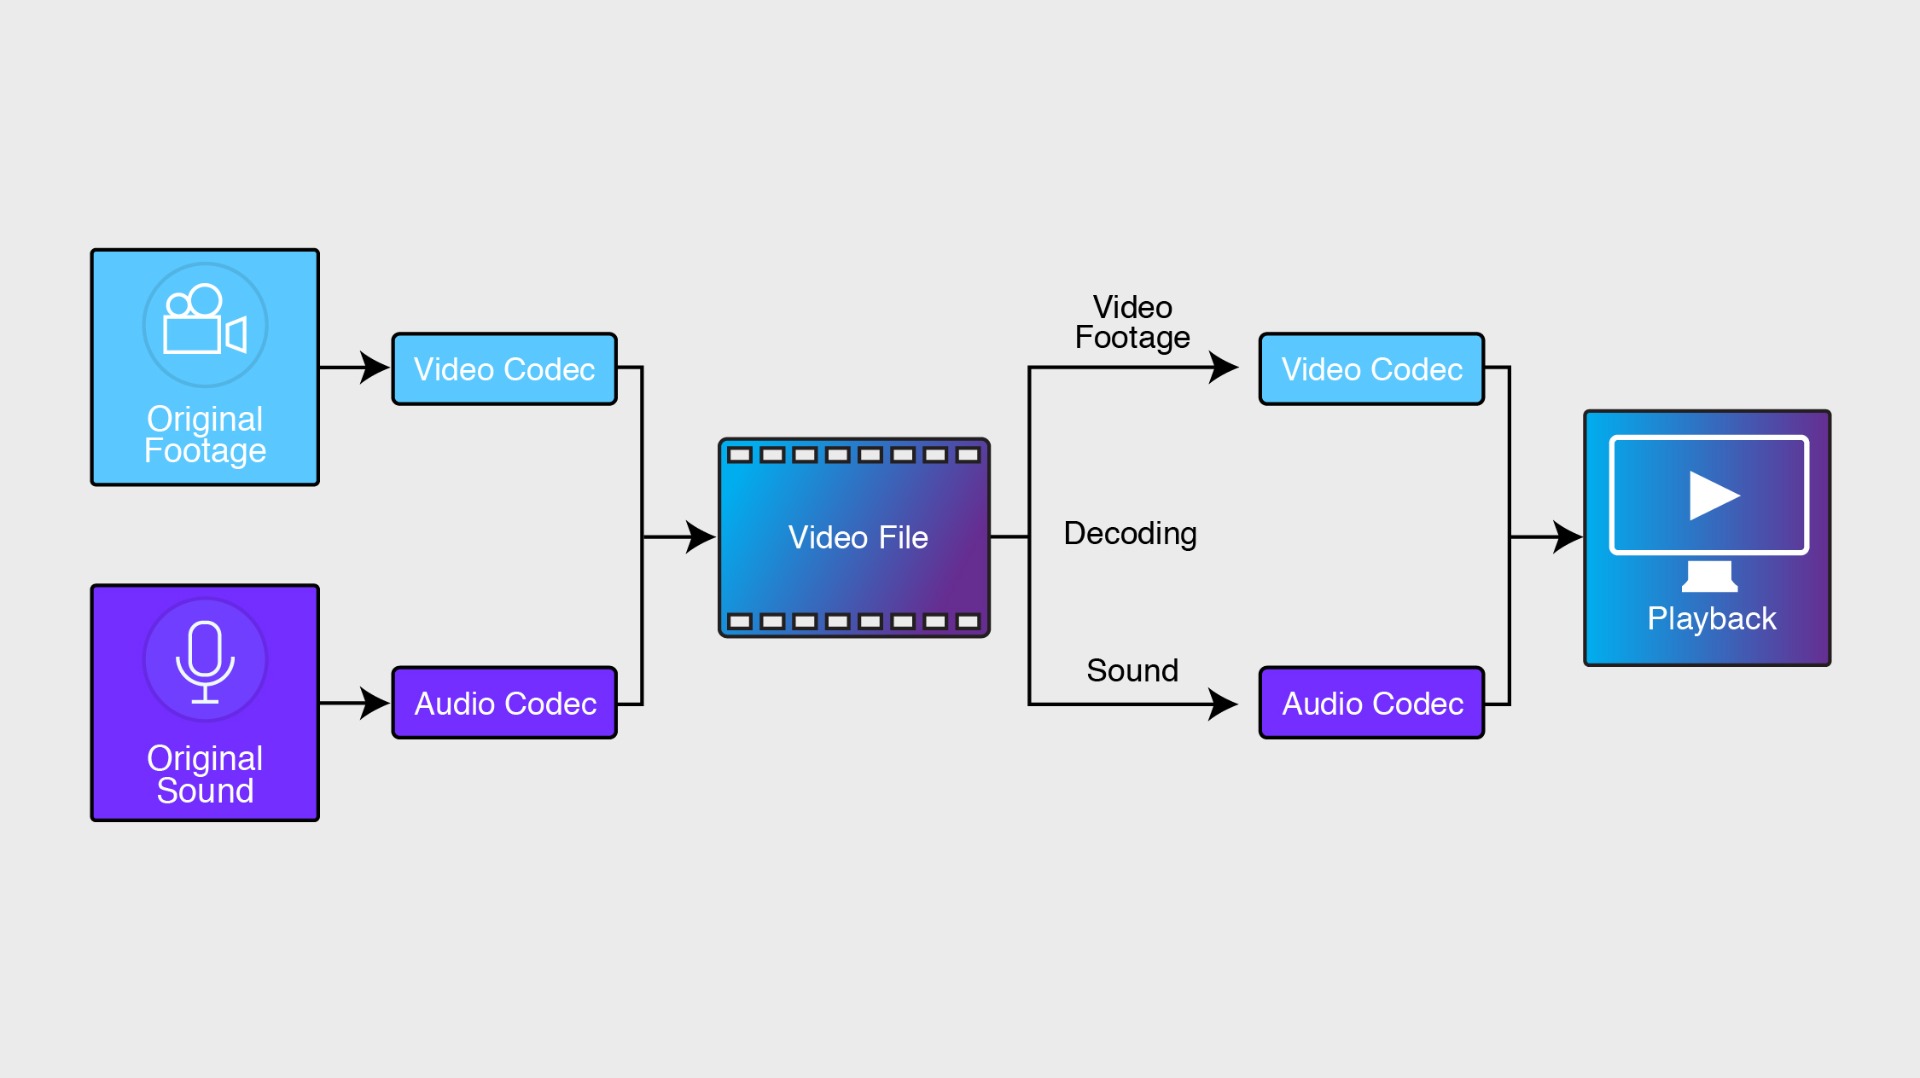
The word codec is a contraction of COding/DECoding (or more easily Compression/DECompression) and a codec does pretty much what it says on the tin. It uses a software algorithm to shrink the file at the writing side and to decode this shrunken file at the reading end of the process. It’s also the job of the codec to set the colour bit-depth and perform the subsampling that we discussed earlier.

Digital compression pretty much all works the same way: the algorithm finds multiple identical sequences of 0s and 1s and then discards all but one of them while at the same time keeping track of how many of these sequences it threw away and exactly where they went so it can all be put back together at the decompression end.
This compression can be either lossy or lossless.
- Lossy compression creates smaller file sizes but it leaves out some of the data, resulting in a compromise of IQ. Repeated compressions in these formats can lead to a cumulative loss of data.
- Lossless keeps all of the data from the original file. This gives you higher video quality and prevents progressive degradation. This means working with larger files.
The majority of codecs you’ll work with will use some form of lossy compression. Lossless codecs are more often found in animation and audio post production.
Two processes that may be important to understand – particularly when shooting video on a Canon DSLR – are Interframe and Intraframe compression.
- Interframe compression (commonly referred to as GOP or LongGOP – that stands for “Group of Pictures”. I’m serious) involves the analysis of the changes in the video from frame-to-frame and makes note of only the parts of the image that have changed and saves that. You’ll see this in your DSLR video format settings as “IPB” and this is the more compressed option.
- Intraframe does all its compression calculations in each individual frame. You’ll see this as “ALL-I” in your DSLR menu.
You’ll often have the same resolution and frame rate setting available in either compression option, for example, FHD @25p - ALL-I and FHD @25p – IPB. ALL-I is the lesser compressed of the two files and therefore “better quality” however IPB delivers an easier to handle file and is appropriate for online applications, especially for things like interviews and “talking heads” where there isn’t a lot of visual variation between frames.
Interframe/LongGOP (IBP) compression is essentially a delivery format, that is it is assumed it’s intended for the end user and little image processing is being done, such as an ENG (Electronic News Gathering) workflow.
In a digital video workflow, you’ll likely encounter several codecs. You’ll often shoot in one codec (a capture codec) then have to transcode (convert) that to a different codec for your editing software then output to yet another one for delivery to the client or web hosting service.
Common types of codecs you’ll see are MPEG-4, H.264 (AVC), ProRes, DNxHD (Avid) and the newer H.265 (HEVC). H.264 is by far the most widely used codec in video production for actual recording. ProRes (by Apple) was designed (and is extremely popular) as an intermediate (editing) codec. But many high-end cinema cameras have the option of recording directly to ProRes, saving you the step of transcoding (converting) when importing into your editing software. External recorders, such the Atomos range of monitors, also allow you to record in ProRes from compatible cameras.
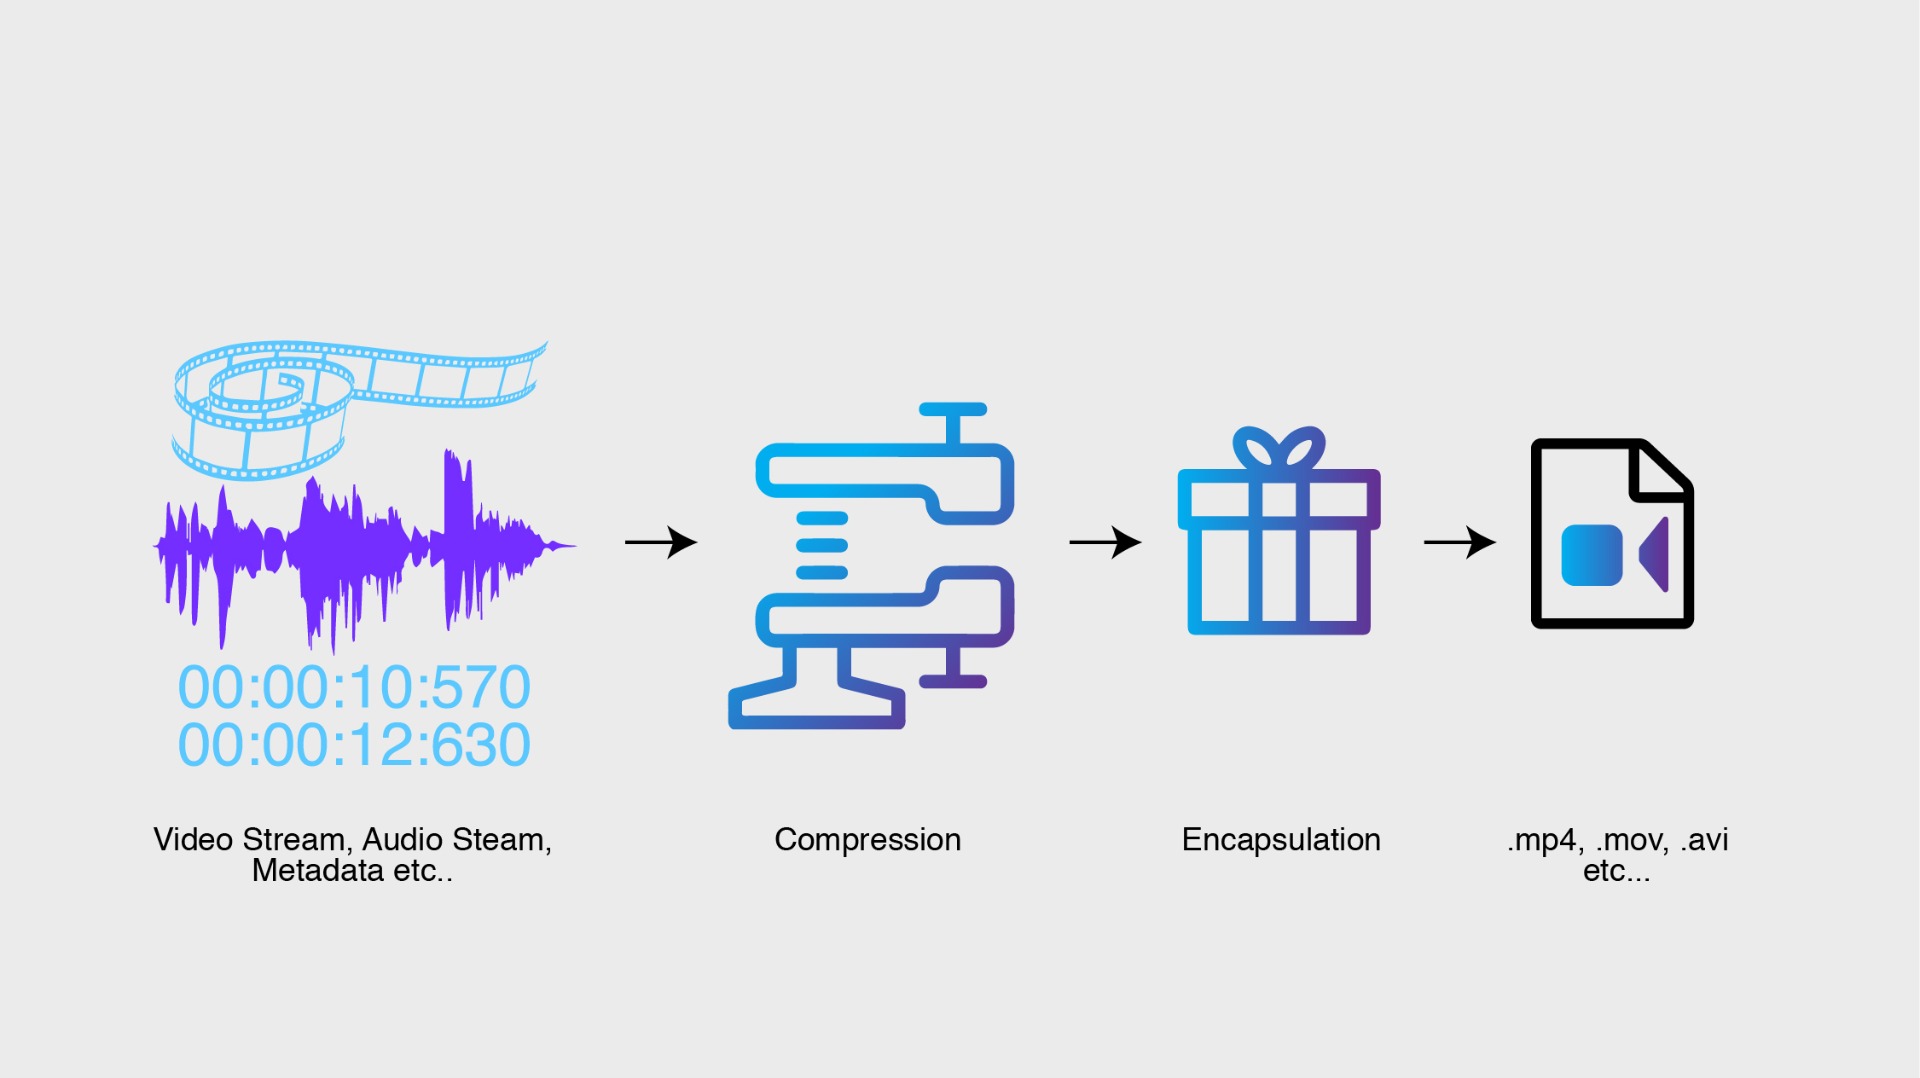
All these codecs are, as mentioned, merely the software that performs the compression. Once the process is performed, the codec needs to deliver the file in a format that can be decompressed and used by another device for playback and editing. This format is called a Container or Wrapper. The codec puts all the video, audio and metadata that its compressed into this container for both delivery and as “instructions” for a device to be able to decode the information. These formats are identified by their file extensions such as .avi, .mp4 (MPEG-4), .mxf (AVC), and .mov (Apple Prores).

Most codecs are licenced which means camera manufacturers and software developers need to pay a fee to use them in their products. There are also widely available “Open Source” (free) codec such as OpenH264 and the range of DivX codecs.
RAW
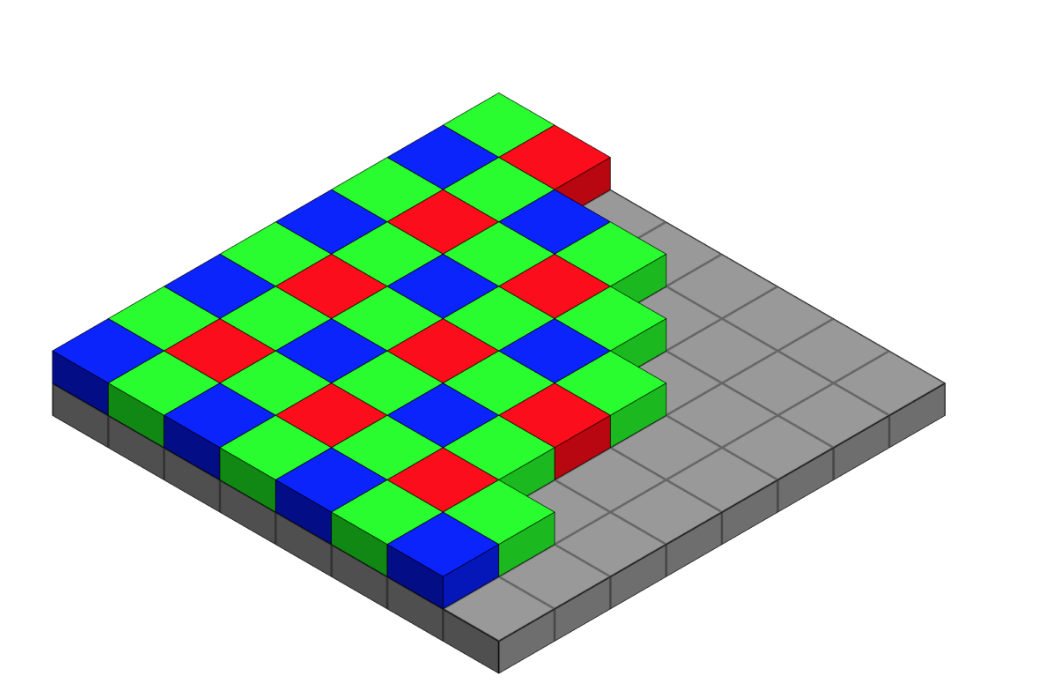
The other end of the spectrum from codecs is RAW video recording. However, even this process often involves some form of processing or compression. All sensors output the Luma information as a greyscale image. Colour is added by what’s known as a Beyer Filter (that’s right – colour isn’t even actually “recorded” – its ‘’determined” by an algorithm). The process of decoding this information into a colour image is called “debayering” (or “demosiacing” due to the tile-like pattern of the pixel layer). This debayering is done via the camera manufacturer’s proprietary process – their “secret sauce” if you will. This why Canon’s renowned “colour science” is unique to them and why not all RAW is equal.

Camera companies such as RED, Blackmagic Design and Canon all deliver their own version of “compressed” RAW (REDCODE RAW, Blackmagic RAW and Cinema RAW Light respectively) although they class these compressed files as “visually lossless”. Other cameras like ARRI and Sony deliver an uncompressed RAW file.
Whichever RAW format from whatever camera you choose, you’re still faced with the main challenge with RAW and that’s editing.
Even though it’s becoming more common for the major editing programs (Avid, DaVinci Resolve, Premiere Pro, Final Cut Pro) to accept these RAW formats natively, the files themselves are large and present a challenge to all but the highest spec computers. Each camera manufacturer will provide their own RAW development software for transcoding the files into something more friendly, but this of course results in a compromise of the RAW image and slows down the workflow.
Another option that lets you maintain the RAW file but still be able do post work on a moderately powerful computer is to work with proxies. A proxy file is a smaller, lower-res file that is recorded simultaneously to the RAW footage. Cameras that can record RAW do so to a high-speed format storage card such as a CFast, XQD or the new CFexpress, while also giving you the option to record a duplicate proxy to an SD card. These proxies are linked to the RAW file so when they are both ingested to the computer’s storage just the proxy files can me imported and worked on in the editing software. Once all the cutting has been completed the project can be "rendered" and the software will go back to the RAW files and take just the footage used in the edit, replacing the proxy with RAW.
So, at this point I may hear you ask: What if my camera doesn’t shoot RAW (or I’m just not that enthused about dealing with all those huge files), but I need to be able to do some intensive colour processing on my footage? Will these codecs of which you speak with all their colour compression voodoo and whatnot provide a file that allows proper grading?
The answer to that is yes. And that’s what we’ll discuss in the next – and last – instalment when we discuss Colour Space, Log and LUTS. We’ll also finish off the series by going over the one area that stills shooters traditionally have the most trouble wrapping their heads around with video: Shutter Speed.
