Video Basics (Part 4): Colour Space, Log and LUTs
In his final piece, Sydney Retail Manager Neale Head rounds off our Video Basics series with some of his most difficult concepts yet – shutterless shutter speed and straight curves. If you get this, you’re ready to graduate.
PART ONE: FRAME RATES & RESOLUTION | PART TWO: COLOUR DEPTH & SUB SAMPLING | PART 3: COMPRESSION
Running the Gamut of Colour Space
When we shoot video on a standard consumer video camera or our phones, the colour is set to a “what you see is what you get” (WYSIWYG) profile i.e. the camera does its best to achieve the closest representation of what your eye can see that will look nice on most TV screens or monitors.
Professional video cameras do this as well – albeit with more processing power and sophisticated sensors to work with. However, as professional cameras are more often required to deliver content for broadcasting, their “WYSIWYG” profiles need to conform to a standard of colour parameters.
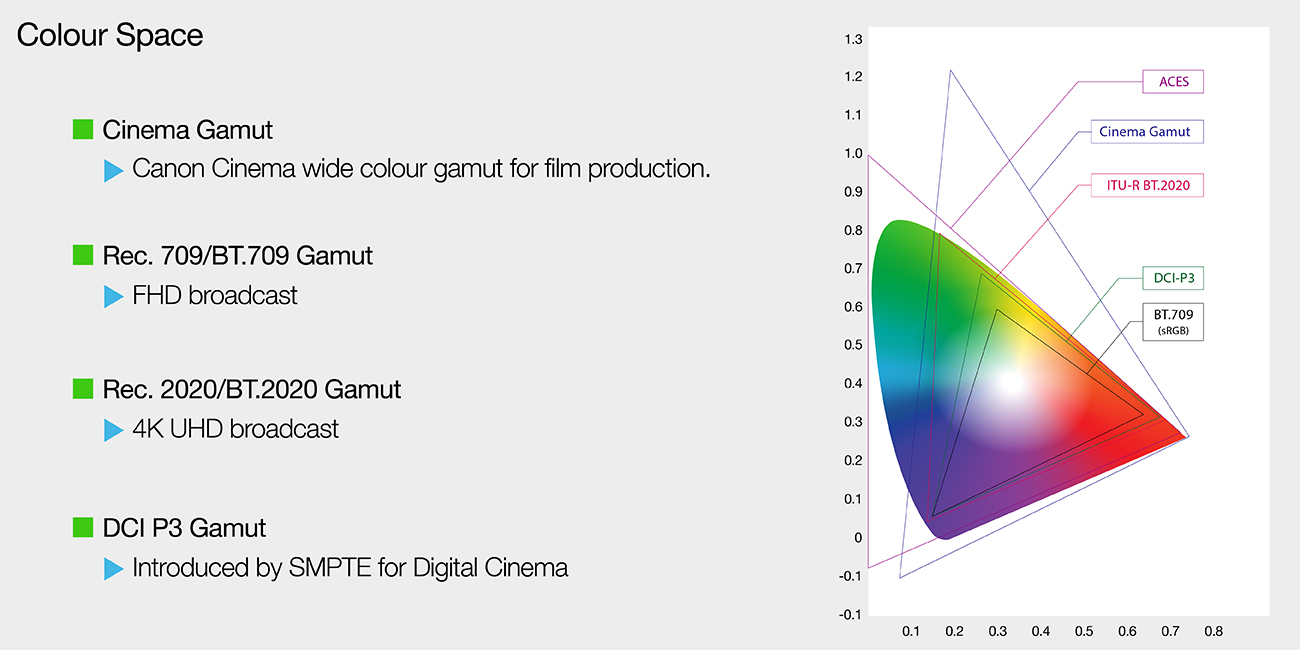
These parameters are determined by what is known as the “gamut” (as in the gamut of what the human eye can see) and the parameters themselves are known as a “colour space”.
Colour spaces vary greatly in how they cover the available gamut as each one has specific intended uses from "run'n gun" shoots to full scale feature film production (for example, Canon Cinema EOS cameras provide a Cinema Gamut which presents an extremely wide space).
The accepted colour space for High Definition (HD) broadcast is called Rec.709 or BT.709. This is short for (are you ready?) ITU-R Recommendation BT.709 – ITU-R stands for International Telecommunication Union Radiocommunication Sector.
Rec.709 is an important setting to understand especially when one moves away from DSLR-based video shooting as it’s the most common colour space used when shooting content aimed at fast turnaround where little or no image processing in post is required (news/current affairs broadcasting, corporate and online videos etc).
Since the advent of 4K HDR broadcast and streaming, a new standard called BT.2020 has been set. But as most 4K footage still ends up in an HD outcome, Rec.709 remains the widely accepted linear colour profile.

Log
Sorry (I imagine you enquiring) did you just say “linear”?
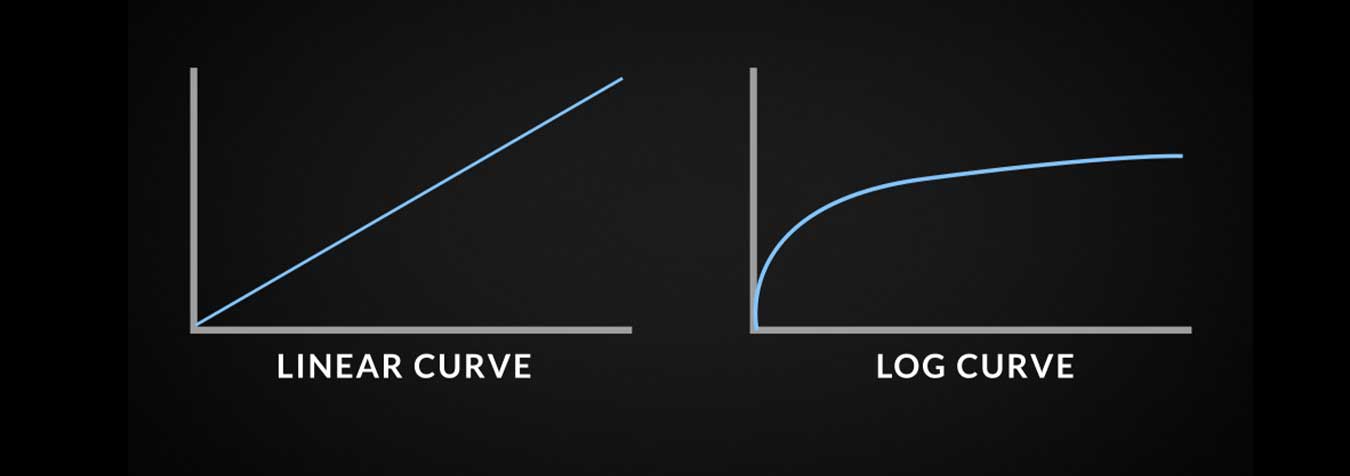
Yes I did, because that’s what these types of WYSIWYG colour models are: linear recordings of exposure values by the camera. We call this a Linear Gamma Curve – except of course there’s no curve.
If we were to plot these exposure values (or stops) on a chart they’d create a straight diagonal line from left-to-right with the bottom left representing blacks/shadows and the top right your white/highlights.
The problem with this straight linear curve is that it doesn’t allow for the best representation of dynamic range (DR). In fact, Rec.709 only provides about five or six stops of DR which means it doesn’t take much in the way of highlights before clipping occurs. It also limits what we can do with the colour in the file as what’s there is decidedly “baked in”.
If we’re looking at doing any sort of colour processing or grading then this is not a good starting place.
As discussed in Part 3, RAW video would be the far better option if we’re looking for wider DR and latitude in colour processing (just as we would expect from RAW vs JPEG in still photography). RAW video recording, up to very recently anyway, has not been widely available in most cameras. However, there is another option that can deliver most of the benefits of RAW without the horrific file sizes.
And that option is to abandon the linear method and embrace the logarithmic. This logarithmic method of recording exposure values (simply known as “Log”) is also a gamma curve but unlike linear it actually presents a curve.

If the bottom left represents our shadows and the top right our highlights, we can see the Log Curve pushes the darker part of the image upwards to retain shadows as the top of the curve shifts downwards to retain highlights. Therefore, you retain more data from each side of the colour curve, significantly expanding DR.
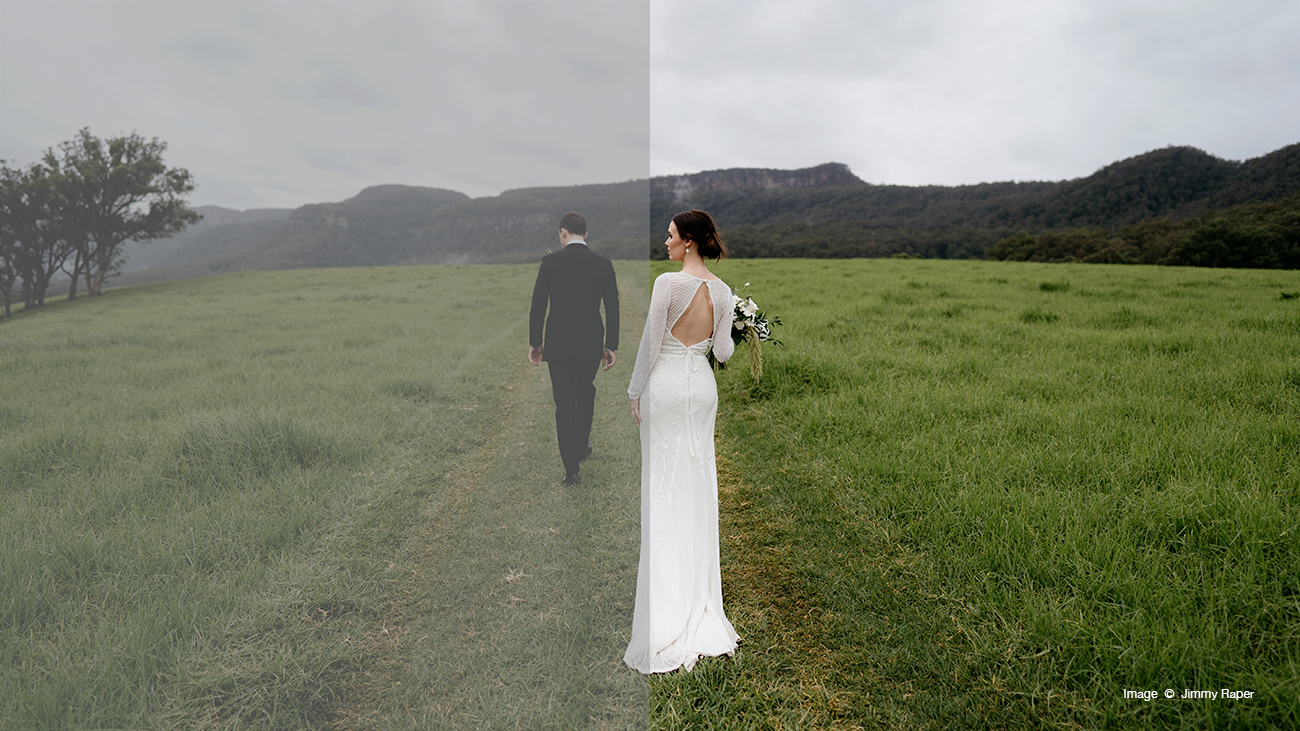
The other defining characteristic of a Log Curve is the “flat” colour profile it delivers. This is notable as when playing back the Log file, the image presents itself as “washed out” both in terms of contrast and saturation – so there are no baked in colours or contrast.
This flat profile allows far greater opportunity for image processing by allowing us to start with something of clean slate. We are able to manipulate colours and pull details out of shadowed and highlighted areas.

Not all Log curves are the same. In fact, each camera maker has its own Log to work with its sensors, processors and colour science (Canon has C-Log, Sony S-Log, Panasonic calls theirs V-Log and Arri provides Log-C). In addition, Canon offers no less than THREE flavours of Log: The original C-Log, C-Log2 and the latest C-Log3.
Of these C-Log2 offers the most DR and the flattest image – which also means it requires the heaviest lifting when it comes to colour grading.
C-Log has the least DR and C-Log 3 sits somewhere in the middle – which is why it’s sometimes referred to as GoldiLogs, for being the “just right” amount of DR/flatness without being too labour intensive in grading.
Which log profiles are available to you depends entirely on your camera. C-log 1 is less commonly found in professional Canon cameras these days as is not really considered suitable for 10-bit and HDR workflows.
Speaking of HDR (High Dynamic Range), this recent display/broadcast process brings with it its own new colour space standard – BT.2100 – and new Gamma Curves – HLG (Hybrid Log Gamma) and PQ (Perceptual Quantization).
HLG is kind of equivalent to a Rec.709 type profile in that is designed to be used in broadcasting where it allows an image to be backward compatible with Standard Dynamic Range displays and requires little image processing. PQ is aimed at cinema style production and requires grading.
LUTs
A “golden rule” I learned from firsthand experience is: “Never show a client footage shot in Log”.
Trust me, no matter how much you explain the concept of grading or (God forbid) gamma curves, nothing will put you in a position of having to regain confidence faster than letting a paying customer see a washed out, colourless image on their monitor or in the rough cut.
Plus, it’s not always helpful to you when shooting for particular style or look to just have that drab image staring back.
This where LUTs come in handy. A LUT (or Look Up Table – not that that is in anyway a helpful acronym) is more or less filter that can be applied to your Log image to give a better representation of what the footage will look like once its graded. On set a LUT can be applied to a monitor, your camera’s video output or even its viewfinder.
LUTs are not just used to make you look good in front of clients though, they provide a reference – or road map – to where you want to go with your grading.
There are many different kinds of LUTs designed to give you any kind of look you can imagine. The most common one – and the one you likely find loaded in your camera or monitors – is a Rec.709 LUT. There are warm LUTs, cool LUTs, HDR LUTs, cinematic LUTs, video LUTs – the list goes on.
You can load these LUTs into your editing or grading to provide you with your outcome reference.
Of course, you can always make your own LUTs. Once you find a look that you’re particularly happy with or you think “defines” your look, you can create that as a LUT and as a quick form of grading. Just apply to your Log – or indeed RAW – image.
Getting an Angle on Shutter Speed
Twice your Frame Rate. That’s it.
If you’re shooting at 25p your shutter speed should be set to 1/50. At 50p its 1/100 and at 100p 1/200. We all good here?
OK, maybe that’s making it simpler than it actually is. Sure, sticking to this rule will get the job done about 95 per cent of the time, but it doesn’t really explain why or how it works.
With all advancements in digital stills cameras, one of things that has remained – at least until the advent of mirrorless cameras – has been the mechanical shutter. When we take a photo a physical curtain still opens and shuts to let light into the sensor. Its what gives us that satisfying “ka-click” sound we associate with DSLR cameras.
It is also why some stills photographers have a harder time with the concept of shutter speed in video than they do with other principles like aperture and ISO.
That’s because when you set your shutter speed to 1/100 for your 50p video on your Canon EOS 5D Mark IV, your camera’s shutter is not going to open for 1/100th of second and close for each of the 50 frames you’re shooting every second. As you can imagine, it’s unlikely you’d ever get anything in the way of useable audio if it did – not to mention the toll it would take on your camera’s shutter count.
Shutter speed in video is a digital recreation of the way light is exposed to celluloid in a traditional film camera. In a film camera, the shutter is a semi-circular plate that rotates on its centre axis at a speed timed with the movement of the film strip through the gate.
A series of sprockets pulls the unexposed film into the gate and holds the frame stationary for a fraction of a second (usually 1/24th) behind the lens to be exposed. The spinning shutter’s job is to expose the frame at the correct period while it’s held still and block the light from the lens as the film moves through the gate onto the next frame. So, half the time the fame is being exposed the other half light is being blocked. In order to do this the shutter needs to rotate at twice the rate the film is moving through the gate.

If the cinematographer needs to shoot at frame rates higher or lower than the standard 24fps, the shutter speed would need to be adjusted to accommodate this. A faster frame rate with a shutter speed set too low would introduce excess motion blur. A normal frame rate with a too fast shutter speed would eliminate the blur, creating an overly sharp or jerky movement.
It’s the same for digital video. By setting your shutter speed at twice speed of your frame rate, you are recreating this dynamic between the rate of frames being exposed in each second and the length of each exposure to create the most “pleasing” approximation of movement from a collection of still images.

Now you know this important rule, here is another important thing to know about shutter speed and video: don’t use it.
OK, so if you are shooting on a DSLR, you don’t really have an option – shutter speed is all you have to work with. But once you move to using higher-end, cinema-style cameras you’re presented with a new concept: shutter angle.
Shutter angle really speaks to the same effect as shutter speed – controlling exposure time and motion blur. Remember how I said the rotary shutter on a film camera was usually a semi-circle? Well this half circle dissected by a straight line through its centre is known as a 180° angle (50 per cent exposure time). Setting your camera to 180° shutter angle is the same as setting your shutter speed to twice your frame rate.
If it’s the same, then why use angle over speed? Basically, when you set your angle to 180° you know you’re good to go for whatever frame rate your using for the shot.
When using shutter speed that setting is only applicable to each frame rate, so you have to remember to adjust your speed each time you adjust the frame rate. With angle it’s pretty much set-and-forget and you can save yourself the heartache of getting back to the office, ingesting all your footage and realising you shot all of your 100p b-roll in 1/50 because you forgot to change it after you finished shooting the 25p stuff.
There are other angles besides the 180 of course. For instance, a 270 shutter angle will allow for longer exposure times, whereas 90 and 45 angles provide shorter exposure. A cinematographer can use these angles (in conjunction with frame rates) to achieve various cinematic effects.
For instance, a high frame rate with a 270 angle (a slower shutter speed) will produce slow-motion footage with excess motion blur creating a surreal or unsettling image (Peter Jackson and Andrew Lesnie used a lot of this in the Lord of the Rings Trilogy and King Kong).
A 24fps rate shot with a 90 angle (25p @ 1/100 equivalent) will give footage a hyper-realistic immediacy by eliminating motion blur.
A cinematographer which used both of these techniques effectively was Janusz Kamiński on Spielberg’s Saving Private Ryan.

Alright I think that just about covers it for this series. There are, of course, many more topics we could delve into within the wonderful world of video production, but as way of introduction I think this has been a good start.
Thank you for joining me and I hope you enjoyed it. If you have any questions or wish to know more about anything to do with video, you can always find me at SUNSTUDIOS Sydney.
Until then.
Neale Head is the Sydney Retail Manager at SUNSTUDIOS Sydney. He has been in the film and television industry for 30 years working with such companies as Village Roadshow/Warner Bros, Fox Studios, The ABC, Timeline Television and Canon.
He has never been to film school and this series of articles represents the most study and research he has ever done.
